
The thought of site migrations and SEOs would be like, well, expect an initial drop in performance both in rankings and organic performance for at least 3 months post-migration. It doesn’t have to be. You can recover a lot quicker after site migrations if you follow best practices. It is, of course, important to set expectations with your senior management that there will be a potential loss of visibility temporarily, but it can be worse with a botched site migration.
In this post, I am sharing my website migration checklist to map out the planning, pre-migration testing, launch, post-launch and monitoring phases of your entire project.
- Website Migration Types
- The Ultimate SEO Website Migration Checklist
- Planning Stage – Pre-Migration SEO Checklist
- Pre-Migration Testing
- Launch Phase
- Post Migration Monitoring
- Reasons Why Website Migrations Fail
Website Migration Types
There may be one or more goals for the site migration. It could either be to improve the functionality of your website, improve the information architecture or improve the platform, structure, content and design. Each of these migrations has different levels of complexity. Before we get into the website migration SEO strategy and other details, let’s look at the various common types of site migration.
- Migration from HTTP to HTTPS: This used to be the most common type of migration when Google announced HTTPS as a minor ranking signal. But these days, you normally see new websites built with website security in mind, incorporating all the necessary SSL certificates to make it safe for users to shop on your website.
- Switching domain names. When companies decide to rebrand, they don’t just change the site logos but also switch to a completely different domain name. A TLD change, say from .com to .co.uk, is also considered a domain name migration. Merging multiple domains into one new domain is also considered a migration of domains.
- Website information architecture / URL site structure changes: Say you were going from a flat site structure to a hybrid structure, this would involve a lot of changing URLs. Typically, this type of migration is done when you want to consolidate and merge duplicate pages. This is your chance to fix incorrect URLs and make them SEO-friendly for better readability, fix your cannibalisation issues and more.
- Website redesign launch: Although this type of migration involves changing the U/X or re-skinning the site with a new template, you need to use this as an opportunity to get rid of old, poor-quality content, improve your site navigation, optimise your code by making it cleaner and leaner, removing unused JavaScript or CSS, etc.
- Merging websites: These types of migrations are fairly common when you decide to migrate from a subdomain to a sub-folder setup. I have handled these scenarios many times when migrating an eCommerce blog from a sub-domain to a sub-directory, and sometimes even when moving one of the international sites from a sub-domain to a sub-folder.
- Migrating to a different CMS / eCommerce platform: For example, switching from WooCommerce to Shopify.
- Migrating to a new hosting provider.
The Ultimate SEO Website Migration Checklist
Planning Stage – Pre-Migration SEO Checklist
This is one of the most crucial stages of your website migration process, as this is where you will be spending most of the time planning and scoping the different components that go into a site migration.
Choosing a slower website period for your migration and ensuring you have the resourcing available is very important. You must establish the right stakeholders from different departments to come up with a joint website migration strategy. The whole process from start to finish will require a lot of communication between the stakeholders. You also need a project manager to coordinate with all stakeholders, arrange meetings and get feedback and get regular status updates on the project.
The SEO team plays a crucial role in the site migration process. So, having a good SEO consultant to represent the SEO team in these stakeholder meetings right from the ground up is important. A migration can go completely wrong if it’s rushed. As an SEO, you need to be in full control, your dev team should be fully on board with your recommendations, and there should be a structured process for things that are getting implemented.
- Benchmark current performance and make a note of your important performance metrics: Record the current keyword rankings and SEO visibility, organic traffic, organic revenue and conversions, number of indexable pages, site speed and other important website metrics.
- Have the latest version of your site crawl report saved on your tool: The day before you launch your new site, run a final crawl of your old site to have the most recent backup of your site information, such as the list of URLs, site structure, internal links, status codes, etc. You can compare the crawl data of your new site with the previous data to diagnose post-migration issues, if any.
- Prepare a list of all your site URLs: Compile a list of all your site URLs that you want to move across to the new site. To do this effectively, you need to create a list of URLs on your website using a range of tools.
- Gather your site URLs from your analytics and search console. Use the index coverage report to export URLs that have been discovered by Google.
- Combine this list with the URLs from SEO crawl tools such as Botify/Deepcrawl/ScreamingFrog, Ahrefs and SEMRush, etc.
- Your top-performing pages in terms of traffic and revenue, and your most backlinked pages, are the most important. So, make sure they are included on your list.
- Don’t forget to extract URLs from your server logs.
- This is your chance to eliminate pages that you don’t want to be migrated.
- Get a complete list of your website subdomains that are going to be included in the scope of the migration, and extract those URLs as well if they are going to be migrated.
- Build your 1:1 Redirection mapping of new URLs for your existing URLs: This is the most crucial part of your migration process and can be the difference between a successful site migration and a migration with issues. This is a step where you map out new URLs for every existing URL of your website. When building your redirection map, make sure you copy over your existing redirects to add them to your new redirect mapping.
- Try to prepare a 1:1 redirect mapping for your URLs where possible, and map it to the closest relevant page or parent category when not possible. Ensure your most important pages are set up with 1:1 redirection mapping. Consider metrics such as traffic, revenue, and backlinks of the pages to decide their importance.
- Don’t forget image redirects, especially the images with backlinks.
- Don’t forget to copy over your legacy redirects. These are the redirects that are in place on your old site. Some sites using a CMS such as WordPress may have redirects implemented via a plugin. You need to be able to get that list, along with your web server-level redirects implemented in your .htaccess.
- Save your website content, including metadata: A lot of work may have been spent by your SEO team in building the authority of your current site over time. It’s important to save all that content that your SEO team have written over the years. Content such as your meta-information (Title tags and meta descriptions), the body content of the important pages of your site, blog, etc. This needs to be transferred across your migrated site. Ensure you have some fallback rules on your new site if the content can’t be transferred to some pages.
- Update internal links. Update all links pointing to a page that is now being redirected. While the 301 redirects will also pass these links to their new location, there’s the risk of having a redirect loop or overloading crawler resources. Point all internal links directly to their new, proper location with relevant anchor text.
- Save your analytics and search console tags: Ensure the verification methods are in a form that can be copied over to the new site.
- Check your Hreflangs: If you are migrating an international website with different URLs for different countries/regions or languages, you need to ensure you have the Hreflangs implemented on your staging site as well, ready for launch. If you are not dealing with an International website setup, this step might not be relevant.
- XML Sitemaps: XML sitemaps are important. They make it easy for search engines to discover your site URLs. Ensure you have a process of XML sitemap creation on your migrated site to quickly discover URLs in the new location. The robots.txt must include a link to the XML sitemap. I would also recommend having an XML sitemap link to your old URLs within your sitemap index, to allow Google to discover the redirects faster to the updated destination URLs.
- Schema/Structured Data: Make sure, at a minimum, you transfer your existing site’s structured data onto your new site. Review gaps in other fancy structured data, such as HowTo Schema / FAQ schema, etc.
Pre-Migration Testing
Make sure you get access to the staging environment to be able to test as much as you can. Your staging site must only be accessible on your own servers, having some sort of HTTP authentication setup to stop search engines or external users from crawling or accessing it. Your staging site must be crawlable. Make sure you whitelist your internal IPs for crawlers such as Botify/Deepcrawl to be able to perform a site crawl of your staging site to check for technical SEO issues. Make sure your staging site is not indexable and not accessible outside your network.
Make sure you’ve allocated enough time for testing the staging environment, and also allow time to fix any issues found pre-migration.
You should perform a full technical SEO audit on the staging site to identify any issues that can be fixed before launch.
Test Redirects: Make sure each URL is redirecting to the proper new URL based on the redirect map you created. Check that the old URLs 301 redirect to the new URL. Make sure your developers have not implemented or used 302 or JavaScript redirects. Also, check for redirect chains and remove the intermediate redirects.
Ensure Analytics (and any other tracking software) is in place and collecting data: Make sure all new URLs and redirected URLs have the existing analytics code in place, and metrics are being tracked. Using the existing analytics account is recommended in order to keep historical data for measuring later.
Run a Complete Crawl of your staging site to check your SEO implementations:
Once the website is live on the staging environment, you should perform a crawl and compare the data to the old website and check for any missing, incorrect, or broken URLs and content. I would check the following;
- If you’re keeping the same pages on the new site, check if the number of URLs on the staging environment matches the number of URLs on the old website.
- Confirm title tags, meta descriptions, H1S and on-page copy are correct (and not missing or duplicated). Crawl for errors and optimisation updates.
- Check if internal links point to the correct destinations on the staging site. If you’ve changed the domain or your URL structure at all, make sure that all of the internal links are updated and pointing to the new, valid site URL.
- Check the canonicals of your pages to see if they are canonicalising to the new URL.
- Ensure your breadcrumbs are in place.
- Validate structured data issues.
- Check the status codes of your staging site URLs.
- Validate your XML sitemap for errors and look for indexable pages that aren’t a part of your sitemap.
- Look for JavaScript links without <a href tags. If it was unintentional, get them fixed.
- Check for broken links.
- Check your hreflang implementations if you are migrating an international website.
- Check your meta robots tags.
- Check for pagination issues.
- Check your robots.txt directives.
- Make sure you have deindexed site search result pages.
- Check if all images are compressed and optimised before being uploaded to the staging site.
Launch Phase
Test your core functionality and SEO recommendations again on launch. Never assume things will be right on launch if the issues were addressed in the pre-migration testing phase.
Re-test everything you have tested on your staging site in the live environment to ensure you don’t have any Technical SEO issues. Run a crawl using Botify / Deepcrawl on the live site to perform a full-scale Technical SEO audit. Compare the crawl data with the old site crawl data to look for any missing, broken, or incorrect URLs or content.
Test Redirects: Check that your redirects are working properly. You can do this quickly by uploading a list of all of your URLs into ScreamingFrog and running a list crawl. This will tell you if they’re redirecting or returning a 200 or 404 status code. You must make sure each URL is redirecting to the proper new URL based on the redirect map you created. Perform a site lookup (site:yoursite.com) on Google to ensure the redirects are properly indexed over time. Review the coverage reports of your search console to monitor new versus old URLs.
Search Console checks and updates: Check if your Search Console is set up correctly for the new site. If you’ve changed your domain, you can let Google know by using the change of address tool in Google Search Console. Submit your new XML sitemaps to Search Console and Bing Webmaster Tools. Remove the old XML sitemaps. Fetch and resubmit your homepage and your sub-homepages.
Check your web analytics configuration: Ensure Analytics is set up correctly, collecting data. Make sure all the new site URLs have the existing analytics code in place, and metrics are being tracked. Using the existing analytics profile is recommended in order to keep historical data for measuring later. Check your top-performing pages to make sure that you’re doing good due diligence around those. Monitor important site metrics such as organic traffic, revenue and conversion rate and measure them against the benchmarks you took before the migration. Annotate launch within the reporting platform.
Update internal links: Point all internal links directly to their new, proper location with relevant anchor text on all your pages. Ensure no staging link URLs are included on live. Update all links pointing to a page that is now being redirected. While the 301 redirects will also pass these links to their new location, there’s the risk of having a redirect loop or overloading crawler resources.
Check the number of indexed pages: This number might drop for a bit after the migration, but with the 301 redirects, the number should climb up to normal or higher if new pages were created. If the number of indexed pages stays low, there could be an issue with the redirects. Also, make sure pages that were eliminated aren’t still being indexed. Check on Google Search Console and via a site lookup (site:yoursite.com).
Update Google My Business listings with new store URLs if they have changed. Update local citations across local listing websites.
Review your robots.txt file: Make sure you have not mistakenly disallowed your entire site in your robots.txt, telling Google not to crawl your site.
Indexable Pages Review: Make sure your site pages are indexable and don’t canonicalise to the staging URLs, and don’t have any no-index directives on your important pages.
Backlinks Updates: Inform linking partners of your new site URLs. If you can get your most valuable backlinks updated to the new URLs, that’s going to be beneficial. This is generally seen as better than a 301 redirect, passing link equity from your old URL to the new URL.
Perform a page speed test across your most important pages, check if they’re slower than the old site, and implement fixes to increase the page load time.
Custom 404 page: Make sure you have a custom 404 set up, and that any broken links actually return a 404 page and not a 200 status code.
Post Migration Monitoring
You need to monitor your website for several weeks post-migration. For some sites, monitoring should continue for several months.
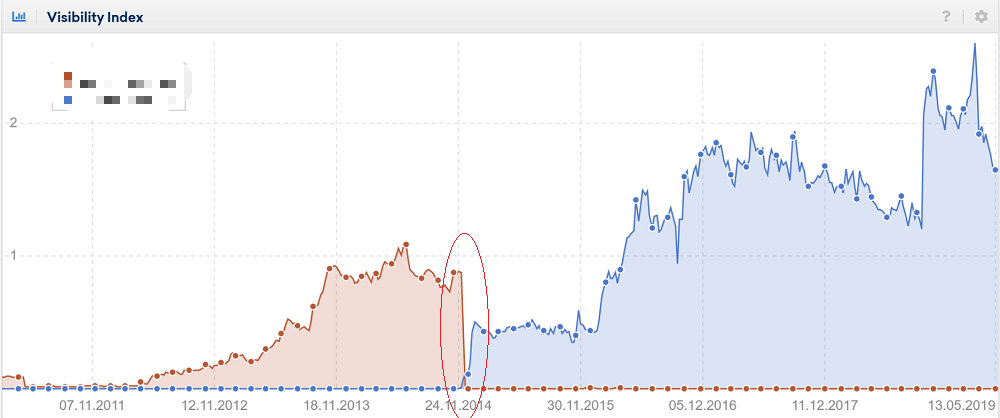
Performance Monitoring: Monitor your search visibility (using tools like Sistrix and Searchmetrics), organic traffic & revenue, bounce rates, conversion rates and keyword rankings over the next few months. There will likely be a drop in organic traffic, but you should recover quickly if everything is done correctly. Monitor the trend of your domain’s keyword position spread.
GSC Checks & Error Monitoring: Check your crawl stats and index coverage reports in Google Search Console, and make sure that your new site is actually being crawled and indexed by Google, or if there’s been a big drop in crawl rates. Continually monitor and fix any index coverage issues that might crop up, such as broken links, internal redirects, etc. Your old URLs should start getting replaced with the new URLs in the search results over time. Check the rendering of your Important page types. Use Fetch as Google via Search Console to verify content can be viewed properly by Googlebot. Also, pay attention to errors on your sitemap file, HTML problems such as duplicate content or title tags and meta descriptions that are too short, too long, or missing.
Review Backlink profile: Review your backlink profile and identify any lost links due to the migration. Look for broken backlinks due to incorrect redirection and fix them if the backlink is valuable to transfer link equity to your new URL.
Monitor page speed: Run page speed tests on the live site and compare with the pre-migration baseline. Add recommendations to the Backlog for your developers to work on.
Reasons Why Website Migrations Fail
- A lack of strategy or pre-migration planning can lead to underestimating the size of the project.
- Migrating the site during the peak traffic period. If you’re an e-commerce brand, don’t pick Q4 to launch your new website, as this can cause a much bigger impact from your loss in traffic and revenue than if you were to launch it in a quieter time.
- Not keeping the relevant stakeholders from various departments of the business can sometimes lead to a loss of functionality in the migrated site.
- If you don’t involve an SEO team or consultant to oversee the migration, important elements can get missed.
- If the migration does go wrong and you’re slow to fix the issues post-migration, this can lead to a long-term impact on your metrics.
- Starting a migration project when you just don’t have the time or resources from your business to spend on a thorough migration.
To Conclude
You may use the best guide to website migrations, but that does not guarantee a smooth migration. You will have a successful migration if you have regular catch-ups between the stakeholders, share all the relevant information at important stages of the migration process and know exactly what’s going on and where the project is at any given point. As an SEO consultant, understanding the risks or concerns and asking the right questions in these meetings is crucial to preparing for the migration. Lack of communication can result in poor migration, having a massive impact on your organic visibility and traffic.
Finally, remember to keep control of your old domain and not let it expire, as you will lose all of those redirects and SEO value that they had if you lose control of your domain.
Do you need help with your site migration? As a Freelance SEO consultant, my job is to safeguard your SEO and be on your side when migrating your site. Contact me today to discuss how I could help.