

Technical SEO should be the foundation of any SEO strategy. Without strong crawlability, indexation, and performance, even the best content will struggle to rank. I started doing SEO audits around 2010 and have since completed 100+ audits over the past decade, both in-house and as standalone SEO consultancy projects.
In this post, I’m sharing my Technical SEO Audit Checklist that you can use to perform a comprehensive technical audit. I’ll cover crawl optimisation, page speed, mobile SEO, JavaScript, international SEO, internal linking, on-page SEO recommendations, structured data, and optimisation for AI crawlers and LLM-based search systems. This checklist is designed to prioritise impact.</strong> The recommendations only deliver value if they are implemented. Focus on fixes that materially improve crawl efficiency, indexation, and performance.
- Crawlability & Indexing
- Site Performance & Core Web Vitals
- Site Architecture & User Experience
- Content & Duplication Signals
- Structured Data & SERP Enhancements
- JavaScript & Advanced Technical SEO
- Monitoring, Diagnostics & Ongoing Audits
- A few other things to watch out for.
- My Favourite Free & Paid Technical SEO Tools
The Ultimate SEO Audit Checklist to Use in 2026
How to Use This Technical SEO Checklist?
This checklist is built for SEO professionals, developers, and site owners auditing medium to large websites. It can be used during a full technical SEO audit, after a site migration or platform change, or as part of ongoing SEO health monitoring.
Before starting the audit, gather essential site context. Identify the CMS in use and any known platform limitations. If the site has recently migrated, document the reason, timing, and any impact on rankings or performance. Confirm whether a staging environment exists and ensure it isn’t indexed by Google. Review Search Console for any manual actions or security issues, and assess whether the site has been affected by recent Core Updates. Finally, check the server location via IP and review the domain’s history. With this groundwork in place, you can move into the detailed technical SEO audit checklist.
Understanding HTTP Status Codes
HTTP status codes determine whether search engines can crawl, index, and trust your pages. Non-200 responses waste crawl budget and dilute internal link equity. As a part of technical SEO site auditing, the first thing you need to pay attention to is the HTTP status codes of your site pages and resources. A server issues a status code in response to a browser’s request. There are over 60 different status codes, each having its own meaning. The most common status codes you would come across during your technical SEO audits are 2xx successful, 3xx redirection, and the problematic 4xx client error or 5xx server error status codes, as shown in the table below.
| Status Code | What they mean |
|---|---|
| 200 | OK (Success). |
| 301 | Permanent redirects: requested resource moved permanently to another location. |
| 302 | Temporary redirects: The requested resource has been moved temporarily to another location. |
| 400 | Bad Request |
| 403 | Forbidden: requested resource is forbidden for some reason |
| 404 | Not Found: The requested resource is not found in the location. |
| 410 | Gone: The requested resource is permanently gone from the location. |
| 500 | Internal/Generic Server Error |
| 503 | Service Unavailable: If a server is overloaded or undergoing maintenance. |
To identify the different status codes of your website, you can use several different methods, such as;
- Aiyma Redirect Path browser extension to do spot checks of certain pages.
- Or use website crawlers such as ScreamingFrog / Botify / Deepcrawl / various others to run a site crawl of your entire site.
Problematic status codes that you should specifically be looking for when auditing websites to find technical SEO issues are 301s, 302s, 404s, 410s, 5xx errors and lots of redirects. 3xx and 4xx errors can be resolved by updating internal links to the correct location instead of using redirects. Speak to your IT team, who maintains the servers, if you encounter a large number of server errors.
Eliminate Broken Links (404s)
Fixing broken links improves the user experience, which otherwise affects user engagement with the website. A large number of 404s is typically seen in e-commerce sites due to out-of-stock products / discontinued categories.
Where possible:
- Restore the URL.
- Remove internal links pointing to it.
- Implement a 301 redirect to the closest relevant page.
Fix internal Redirects (301/302)
Redirect chains increase crawl depth and reduce link equity flow. Fix your internal link redirects, especially redirect chains that cause more hops for a bot to reach the final page. This can dilute the spread of link equity to the final page. Update the redirecting URL to the final destination.
Fix Duplicate Page Titles & Meta Descriptions
Duplicate titles can cause cannibalisation issues. All indexable pages should have a unique title tag.
Ensure you implement unique, enticing meta descriptions to help with CTR from the SERPs.
Review your Heading Tags (H1S)
H1S are used to tell Google what the page is about and can be very important when optimising pages for target search terms. Make sure every indexable page has a unique H1 tag and that no page has multiple or duplicate H1 tags.
Ensure the presence of headings, page titles, and meta descriptions, as title tags and H1S can influence Google’s page ranking, and each page should have a unique meta description.
Review Noindexed Pages
Regularly audit your website to ensure pages that aren’t beneficial remain set to noindex. This status is defined by the meta directive in the <head> section of the page.
<meta name="robots" content="noindex">
Ensure:
- Valuable pages are not accidentally noindexed
- Internal search results remain non-indexable
- Internal links don’t point to noindex + nofollow pages unnecessarily
Site Architecture & Internal Links
Internal linking defines how authority flows through your site. A poor structure can prevent important pages from ranking, regardless of content quality. Having a clear site structure with optimal internal linking is key to effective search engine indexing and user experience. The structure aids user navigation and helps search engine bots understand your site hierarchy. Additionally, internal links distribute link equity and PageRank throughout the site.
To optimise your internal links, ensure they’re relevant and reduce the amount of duplicate content to prevent wasting link equity. Remove low-quality pages and use the “nofollow” directive to avoid passing link equity to unnecessary pages. Avoid adding too many links on pages and identify unlinked pages using site crawl reports, log files, search console, and analytics data. Include less important pages or directory structures in the robots.txt file to prevent them from being crawled and distributing link equity.
 Reduce the crawl depth of your most important pages
Focusing on the crawl depth of important pages can help distribute link equity more effectively. Links can be found in various areas such as the navigation menu, body content, footer, sidebar, or related sections. It’s vital to have your homepage link to the most popular pages of your site, as it usually receives the most external links.
Review internal links by manually checking or using tools like ScreamingFrog, Botify, or Deepcrawl. Visualising your site’s internal linking structure and crawl depth can be done using Sitebulb or ScreamingFrog. Regularly review your site’s internal linking to the most important pages, focusing on pages with high search demand and revenue contribution. Ensure that category pages link to relevant sub-categories and product pages. Verify if product pages are linking back to sub-category and category pages. Additionally, confirm that category pages are interlinking with each other, and product pages are linking to other related product pages.
Some examples of sites getting internal linking right;
 Find similar items here in the section on Sports Direct
 Vacation Destinations Near Section on Hometogo
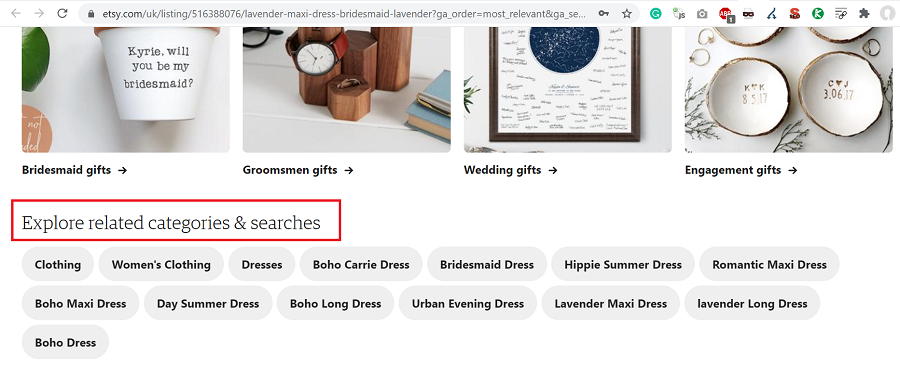 Explore the related categories & searches Section of Etsy
Ensure print versions are non-indexed, non-www. redirects to www. (or vice versa) are set up, and important pages are within 4 clicks from the homepage. Descriptive anchor text should be used in internal links pointing to important pages. Check for long, uppercase, underscore, or non-ASCII URLs. Verify your URL structure indicates the site’s hierarchical tree and that no pages are duplicated due to poor architecture.
Check for correctly implemented breadcrumbs across the site, ensure primary navigation is user-friendly, and check if faceted navigation creates indexable URLs. Utilise an HTML Sitemap, and check for redirect loops, 5xx server errors, 4xx errors, or any internal links leading to 404 errors.
Best practices:
- Keep important pages within 3–4 clicks of the homepage.
- Use descriptive anchor text.
- Avoid excessive links per page.
- Identify orphaned pages via crawls and GSC.
- Homepage → Category → Subcategory → Product remains the optimal structure for most large sites.
URL Structure
URLs act as a minor ranking factor.
Good URLs:
- Are human-readable.
- Keyword-rich.
- Reflect the site hierarchy.
- Avoid unnecessary parameters.
Let’s take an example of a facetted URL from the House of Fraser website – https://www.houseoffraser.co.uk/women/dresses/maxi-dresses. The URL format is clear for both users and search engines what the page is about and what they are likely to find within. Make it as clear as possible to search engines by laying out your URLs in an ordered format. You can also see the journey the user has followed to reach that specific maxi dress page.
When it comes to the importance of URL structure versus click depth, John Mueller revealed that click depth determines page importance more than the URL structure. You must ensure that your key pages are as closely linked to the homepage as possible.
HTTPS Website Security
HTTPS, the secure data transfer protocol, significantly boosts the trustworthiness of your website, further influencing its Google ranking. As your site’s security is crucial, ensure that all components like internal links, images, and ad networks load via HTTPS.
- Set up automatic redirection from HTTP to HTTPS and maintain a valid SSL certificate.
- Ensure that all your pages correctly redirect from HTTP to HTTPS, with no URLs left on HTTP.
- Watch out for any mixed content loading over both protocols.
- Also, review security headers such as HSTS and Content Security Policy (CSP).
Review the robots.txt file
Robots.txt controls crawler access. The file, placed in the root directory, instructs crawlers and user agents (Googlebot, Bingbot, Yandexbot, etc) on which parts of your site to crawl or ignore. Its ‘Allow’ and ‘Disallow’ directives guide crawlers, and the ‘Sitemap’ directive points them to your XML sitemap. We block certain sections of a website from crawlers using Robots.txt to prevent crawl budget wastage of site sections you don’t want getting indexed.
Ensure:
- Important sections are not blocked.
- Search result pages are disallowed.
- Sitemap is declared.
Page Speed Checks & Improvements
Performance directly impacts rankings, UX, and conversions. Page speed is critical for both user experience and SEO, with faster pages typically leading to better rankings and conversions. Pages that load more slowly often suffer from higher bounce rates, negatively affecting your website’s performance and ranking.
Monitor:
- LCP (Largest Contentful Paint)
- INP (Interaction to Next Paint)
- CLS (Cumulative Layout Shift)
- Interaction to Next Paint (INP)
- Time to First Byte (TTFB), total page weight, fully loaded time, and number of requests for your important pages or page templates.
Optimisations include:
- Choosing a reliable Web hosting company.
- Server response time improvements
- Image compression & lazy loading: Having lots of images or large images on your web pages not only affects overall performance for a user but can also have an impact on the ability of the page to rank on Google. Optimising the size of images using image compression techniques. You can use a lossless optimiser such as ImageOptim or FileOptimizer to make your images download faster, without losing quality. Lazy load images below the fold.
- Removing render-blocking resources
- Minification of HTML, JavaScript, and CSS.
- Check if GZIP Compression is enabled.
- Enabling Cache – Server and Browser caching through CDNs.
- Check if the website uses the HTTP/2 protocol.
- Audit the Google Tag Manager to remove unnecessary tags.
- and more…
Various tools, such as Google Page Speed Insights/Google Lighthouse, WebPageTest, and Google Search Console’s speed report, provide valuable in-depth analysis and recommendations and quick fixes. Addressing these issues can lead to significant savings in load time.
A comprehensive performance improvement strategy using a mix of speed-check tools is encouraged, as each has the potential to reveal unique insights.
Check your XML Sitemap for Issues
An XML Sitemap is a way of telling search engines about your site URLs (pages, videos, images, etc) you wish to be indexed in search results. An HTML sitemap, on the other hand, helps users navigate the site. The XML sitemap must contain the URL and the last modified date. It can also contain other optional fields, such as alternate language versions for an International site. A clear sitemap quickly shows search engine crawlers the key pages you want them to discover sooner. Especially beneficial for large sites.
Sitemaps should reflect what you want indexed, not everything that exists. Ensure XML sitemaps contain:
- Only 200 status URLs
- Indexable pages
- Self-referential canonicals
Using a site crawler or your search console, identify any XML sitemap issues, such as the inclusion of non-200 status code URLs, non-self-canonicalised URLs, or non-indexable URLs. As part of your sitemap audit, you might also discover orphaned URLs in the XML sitemap, which can then be linked within your site’s architecture.
Make sure the XML sitemap has been submitted and successfully processed by Google Search Console. Resolve the issues related to indexable URLs that are not included in the XML sitemaps, a situation that frequently occurs in e-commerce websites.
To check if a site has an XML sitemap or sitemap index, check the site’s robots.txt and look for the sitemap declaration.
Check Mobile-First Indexing Best Practices
In this mobile-first era, where users are increasingly more active on mobile devices, effective mobile-first SEO strategies and ensuring a mobile-friendly site are crucial. Google, having introduced mobile-first indexing in March 2018, primarily crawls, indexes, and ranks websites based on their mobile version. Follow the Google developers documentation link if you want to read in-depth details on Mobile-first indexing best practices.
So, what are the best practices to ensure mobile readiness?
- Maintain parity between your mobile and desktop sites, covering all valuable content like Menu Links, Main body content, Footer and Sidebar links, and Schema markup. If you have a good responsive design (Google recommends this), you should be OK.
- Responsive design: Your website must be responsive to provide an optimal viewing experience across different devices and browsers. If your site uses separate URLs for desktop and mobile versions, it’s essential to use rel=”alternate” tags to define the mobile version of a page. For instance: <link rel=”alternative” media=”only screen and (max-width: 640px)” href= “https://m.example.com/page.html”/> on your desktop version. Simultaneously, your mobile page should have a canonical tag pointing back to the desktop version.
- Correct viewport meta tag: Ensure your site is mobile-friendly, free from any usability issues on mobile devices. Use the viewport meta tag for an optimal user experience: <meta name=”viewport” content=”width=device-width, initial-scale=1″>.
It’s important to carry out regular checks for responsive design, appropriate image use and resizing, AMP utilisation, video implementation on mobile, pop-up/interstitial management, mobile navigation, and ease of mobile checkout. Also, ensure links and buttons are easily clickable and the Favicon is displayed in mobile SERPs. These checks will assure a seamless and user-friendly mobile browsing experience.
Check issues with Canonical Tags
Canonical tags are hints. Incorrect usage can remove pages from the index. Canonical tags are valuable in SEO, utilised to indicate to search engines the preferred version of a page URL for indexing. The lack of a self-referential canonical tag can render a page non-indexable. Canonical tags can be placed within HTTP headers or the HTML head, but remember, they’re treated as hints by Google, not directives. Their primary role is to mitigate issues related to duplicate pages by signifying which version should be indexed in search results.
Best practices for canonical tags include:
- Implement self-referential canonical tags on unique pages intended for indexing, signalling to search engines the preferred version for indexing. Verify that all canonical tags return a 200 status code
- Utilise canonical tags on eCommerce sites’ facetted/filter pages to minimise duplication and prevent filter pages from targeting similar terms as your category page. Check out my SEO guide for eCommerce sites or WooCommerce-based eCommerce sites here.
- Avoid canonicalising to a redirected, non-indexable, or non-200 status code page, as it may confuse search engines and lead to canonical chains.
- Ensure pages within a paginated series have self-referential canonical tags. Incorrect implementation, common on e-commerce sites, often results in all paginated pages within the series canonicalising to the first page.
- Handle parameterised URLs carefully.
- Avoiding the usage of multiple canonical tags, which can lead to conflicting signals about the preferred page for indexing.
- Don’t canonicalise paginated pages to page 1.
To identify canonical tags:
- Inspect the DOM or the unrendered HTML in Page Source, searching for “canonical”.
- Utilise a crawler like Screaming Frog to review canonical tags across your site. This can help identify missing self-referential tags, tags pointing to another page, or incorrect tag implementation.
- Use Google Search Console to inspect single URLs or review excluded URLs in the coverage report.
Check Issues with Pagination Implementation
Pagination, typically implemented via traditional numbered pages or a user-friendly ‘Load More’ button, helps structure your website’s content. While rel=prev/next markup was once crucial for indicating paginated series to Google, it’s no longer essential since Google’s 2019 announcement. Yet, if properly executed, it’s harmless to keep it. Incorrect implementation of pagination can cause spider/bot traps.
- To spot incorrect pagination implementation, a crawler like Screaming Frog can be utilised. It can identify issues such as non-indexable paginated URLs or non-self-referential paginated URLs. Your paginated series should be indexable and self-canonicalised. It’s incorrect to canonicalise paginated URLs back to the first page, a mistake often made by website owners.
- Sites employing the ‘Load More’ pagination often face the issue of using JavaScript without a crawlable <a href> link for bots, limiting their crawl beyond the first page. By inspecting the DOM of the ‘Load More’ button, you can check whether it contains real anchor links to the next page of the paginated series.
- Infinite scroll is another pagination method used by some sites. These sites must ensure that their implementation supports paginated loading with unique links to each page for proper crawling. Check for these unique links by inspecting the DOM and searching for the next logical page link. Remember, links to the next & previous pages should be accessible to all users, ensuring easy crawling of all paginated pages for both bots and users with JS disabled.
Assess the website’s pagination setup. Ensure pagination is implemented correctly, with the necessary elements for bot accessibility. Check for indexable paginated series and appropriate canonicalization.
Images Optimisation
While we’ve discussed image optimisation under page speed, it’s also crucial to evaluate site-wide image usage. Consider factors like the total number of images used on the page, the presence of alt text, appropriate image file naming, and size optimisation.
Check:
- File size (avoid >100KB where possible)
- Alt text
- File naming
- Overuse of stock imagery
Validate Schema Markup
Structured data helps search engines and AI systems understand your content. Implementing it can enhance your site’s appearance in the SERPs. By defining what you would like to see for some elements in the structured data, you can standardise the display of your brand in SERPs. Some benefits of implementing schema include displaying rich search results, rich cards (on mobile), knowledge graphs, breadcrumbs, carousels and more in SERPs.
Common types:
- Product
- Review
- FAQ
- Breadcrumb
- Organization
 Example with Review & FAQPage schema from TripAdvisor
The popular schema markup types are JSON-LD (Google’s preference) & Microdata. Microdata are HTML attributes within markup throughout a page. JSON-LD is a structured JSON object produced and injected into a page in one piece. Where possible, use JSON-LD schema markup as it’s generally easier to implement and maintain. Click here to view an example of Product structured data using JSON-LD, RDFa & Microdata.
Use the Structured Data Testing Tool to validate if the schema markup is implemented correctly. This can help find and resolve technical issues, including missing required fields.
Optimise for AI Crawlers & LLM SEO
Search has evolved. It’s no longer just about Googlebot and Bingbot. AI platforms like ChatGPT and Perplexity now use their own crawlers and retrieval systems. A modern technical SEO audit should check whether your site is discoverable, crawlable, and optimised for AI assistants.
Key technical checks for AI readiness:
- Robots & WAF rules: Ensure you’re not accidentally blocking AI crawlers in your firewall or robots.txt. For example:
User-agent: OAI-SearchBot
Allow: /

User-agent: ChatGPT-User
Allow: /

User-agent: GPTBot
Disallow: /
OAI-SearchBot – lets ChatGPT find and show your site in answers.
ChatGPT-User – fetches your page when someone asks ChatGPT to read it.
GPTBot – used for training AI models (block if you don’t want your content used for this). - Clean, server-rendered HTML: Render essential content server-side. Use unique URLs, self-referential canonicals, fast TTFB, and real
<a href>links (avoid JS-only links for nav/content). - Sitemaps: Submit XML sitemaps split by type (guides, products, stores, product categories, help). For Bing, also implement IndexNow for faster inclusion.
- Structured data (JSON-LD): Add relevant types:
Product,Offer,Review,HowTo,FAQPage,Organization,LocalBusiness,BreadcrumbList. - Authorship & freshness signals: Show author, last updated date, and references. These signals help with inclusion in AI summaries.
JavaScript
JavaScript, a lightweight programming language, is widely used for scripting UX elements and events. Since Googlebot’s 2019 switch to Chromium, rendering JavaScript has become less problematic. However, heavy reliance on JavaScript for content loading may still cause indexing delays due to the intensive rendering process.
How to identify if JavaScript is causing an issue on your website?
- Do your internal links or page content rely on JavaScript? To check this, disable JavaScript using a Chrome extension and observe any differences upon page reload.
- Compare your page’s source code with the DOM, or the rendered page, to identify content dependent on JavaScript.
- Execute two site crawls using a JavaScript-enabled crawler and a text-only rendering crawler (like the default in Screaming Frog), and note any discrepancies.
How do we handle heavy JavaScript Sites to Optimise for Googlebot?
To optimise JavaScript-heavy sites for Googlebot, pre-rendering can be used. This method involves server-side rendering and caching of pages, which are then served to search engines.
The following checks are essential to ensure effective JavaScript use:
- Does your website heavily rely on JavaScript?
- Does the site function correctly without JavaScript, and does the primary navigation menu load when it’s disabled?
- Can Google crawl, render, and index the executed JavaScript without issues?
- Are there differences between the source and rendered HTML, and what changes does JavaScript make to the webpage?
Log File Analysis
An integral part of a comprehensive technical SEO audit is the Regular server log analysis. This involves evaluating your server logs to gain deeper insights into search engine bot behaviour.
Analyse logs to understand:
- Crawl frequency
- Crawl budget waste
- Response codes
- Last crawl dates
To ensure a comprehensive analysis, consider using either the last 60 or 90 days’ worth of data.
Monitor Google Search Console
Google Search Console is a free and invaluable tool for site owners and SEOs. GSC includes 16 months of search traffic data and offers a suite of key reports, including index coverage, server errors, sitemap issues, page speed (including Core Web Vitals), internal links, and mobile usability, among others. These reports help monitor, troubleshoot, and resolve critical site issues. Fix what Google is explicitly reporting – it’s the fastest path to improvement.
In November 2020, Google introduced a much-improved version of the Crawl Stats Report, available under the Settings panel in GSC. This update gives webmasters, especially those without access to server logs, a clear view of how Googlebot interacts with their site. To view the new crawl stats report, visit this link or locate the report on the Settings page.
The enhanced Crawl Stats Report provides crawl request breakdowns by:
- Status code – 200s, 301s, 404s, 5xx errors and more. Great for monitoring crawl budget wasted on non-200 pages.
- File type – HTML, JavaScript, CSS, image files, etc.
- Purpose – Discovery vs. refresh crawls. A rise in discovery crawls is usually a good sign that Googlebot is finding fresh content.
- User-agent – See how often Google’s smartphone vs. desktop bots are crawling your site (expect mobile-first bots to dominate).
- Host status – Useful for identifying crawl frequency across subdomains and spotting host availability issues.
This is especially valuable for smaller websites with limited IT support, giving SEOs similar insights to log file analysis without needing direct access to logs. If you’re into server log data, I recommend checking out Jamie Alberico’s talk on uncovering crawl insights using log analysis.
Personally, on a day-to-day basis, I use Search Console to:
- Analyse search query impressions, clicks, and ranking positions. Are trends moving up, down, or staying flat over the last 16 months?
- Investigate indexing issues. Check how many pages are excluded and resolve cases where important pages aren’t being indexed. Watch for spikes in “Soft 404s,” video indexing problems, and canonical mismatches.
- Monitor sitemap submissions and errors.
- Review index coverage for crawl or indexing anomalies.
- Act on email alerts for detected site issues.
- Use the URL Inspection Tool to debug indexation, crawling, and canonicalisation problems.
Fix what Google is telling you. Google has published helpful search console training videos on their YouTube channel, guiding site owners on how to monitor performance and fix issues that may affect their visibility in search results. And don’t forget to link your site to Bing Webmaster Tools, which has seen significant improvements recently.
A few other things to watch out for
- Faceted navigation traps: Review the Faceted Navigation of your e-commerce sites for common issues. If not handled correctly, faceted navigation can cause duplication, massively eat up your crawl budget and dilute your main page’s link equity to low-value pages.
- site: searches: Perform Google searches using the ‘site’ command for your domain – site:domain.com. Review SERP listings and look for issues.
- Hacked or cloaked pages: Track down issues such as hacked pages, cloaking, blocked resources, doorway pages, hidden on-page content or links, improperly canonicalised pages, and unexpected robots.txt changes.
- NAP consistency: Ensure consistent Name, Address, and Phone number (NAP) information across your website and external sites, including Google My Business (GMB) listings, and make sure the GMB listings include the location for improved local search results.
- Be wary of JavaScript redirections and the usage of Flash and iFrames.
- Accessibility & HTML validation
- Lastly, ensure to keep a check on your site’s HTML usage:
- Look out for deprecated HTML tags and validate your HTML.
- Assess your site’s accessibility and see how JavaScript is being used.
- Confirm if your CSS is minified and limit the use of inline CSS.
- Evaluate your site’s ad placements and ensure there isn’t an overuse of ads.
- Check if your site bombards visitors with pop-ups and interrupts the user-friendly experience.
My Favourite Free & Paid Technical SEO Tools
- Webmaster Tools: Google Search Console, Bing Webmaster Tools
- Log analysis + cloud-based site crawlers: Deepcrawl, Oncrawl, Botify.
- Desktop website crawlers: Screaming Frog SEO Spider, Sitebulb.
- Page Speed tools: WebPageTest, GTMetrix, Google Page Speed Insights (Also install the Lighthouse extension)
- Image Compression Tools: ImageOptim, FileOptimizer
- Site Audit Tools: SEMRush / Ahrefs.
- Browser Extensions: Ayima redirects the path browser extension, SEO META, in 1 CLICK.
- Site monitoring tools: Robotto, Little Warden, VisualPing
Need Help with Technical SEO?
If you don’t have the time or resources to run a full technical audit, as a Freelance Technical SEO consultant, I offer hands-on technical SEO audits focused on impact, not noise. I crawl, analyse, prioritise, and translate findings into actions your dev team can execute. </span>
Contact me today to discuss how I could help.